Recently, I was trying to build a "multi-screen" or "multi-view" application in Go using the Bubble Tea library. Now, for those who don't know, Bubble Tea is a framework for building terminal-based UIs/applications which is based on The Elm Architecture. Not only this, Bubble Tea also ships with a lot of "sister" libraries which can be used to further enhance your experience of building CLI or TUI applications with Bubble Tea. Bubbles and Lip Gloss are two such libraries which are built on top of Bubble Tea and which I am also using through this article.


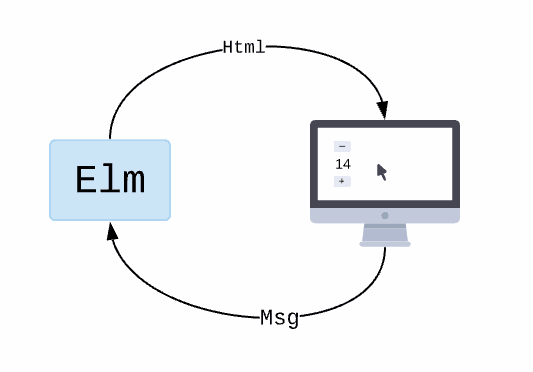
Now, back to the basic problem. All I wanted to do was to switch between two (or potentially more) screens. So, let's start by building two example screens — one with a spinner and the other with a simple text message. But before we do that, let's first see how The Elm Architecture works. Right here, you can see picture of the Elm Architecture which I stole from the official Elm guide. The Elm Architecture is based on three main components:
- Model: The state of your application
- Update: The way you update your application's state based on messages
- View: The way you turn your application's state into a UI (HTML in Elm's case, but in our case, it's a string of text for the terminal)
Building the First Screen
So, let's start by defining our first screen model — this will store the state for our first screen which contains just a plain text message. It can be of any type, but Bubble Tea recommends using a struct. Since our model does not have any state, we can just use an empty struct. Here's how we can define our first screen model:
type screenOneModel struct {
    // ...your options
}
Now, let's define the Init method for our model. This method is used to initialize the model and can be used to run any commands which you want to run when the model is initialized. In our case, we don't have any commands to run, so we can just return nil from this method. Here's how we can define our Init method:
func (m screenOneModel) Init() tea.Cmd {
    return nil
}
Now, let's define the Update method for our model. This method is used to update the model based on messages. In our case, we want to switch to the second screen when any key is pressed. Here's how we can define our Update method:
func (m screenOneModel) Update(msg tea.Msg) (tea.Model, tea.Cmd) {
    switch msg := msg.(type) {
    case tea.KeyMsg:
        switch msg.Type {
        case tea.KeyCtrlC:
            return m, tea.Quit
        default:
            // any other key switches the screen
            return screenTwo().Update(msg)
        }
    default:
        return m, nil
    }
}
Now, let's define the View method for our model. This method is used to turn the model into a UI. In our case, we want to display a simple text message. Here's how we can define our View method:
func (m screenOneModel) View() string {
    str := "This is the first screen. Press any key to switch to the second screen."
    return str
}
Building the Second Screen
Second Screen is similar to the first screen, Here's the complete code for the second screen:
type screenTwoModel struct {
    spinner spinner.Model
    err     error
}

func screenTwo() screenTwoModel {
    s := spinner.New()
	s.Spinner = spinner.Dot
	s.Style = inputStyle
    return screenTwoModel{
        spinner: s,
    }
}

func (m screenTwoModel) Init() tea.Cmd {
    return m.spinner.Tick
}

func (m screenTwoModel) Update(msg tea.Msg) (tea.Model, tea.Cmd) {
    switch msg := msg.(type) {
    case tea.KeyMsg:
        switch msg.Type {
        case tea.KeyCtrlC:
            return m, tea.Quit
        default:
            // any other key switches the screen
            return screenOne().Update(msg)
        }
    case error:
        m.err = msg
        return m, nil

    default:
        var cmd tea.Cmd
        m.spinner, cmd = m.spinner.Update(msg)
        return m, cmd
    }

	return m, nil
}

func (m screenTwoModel) View() string {
    str := fmt.Sprintf("\n   %s This is screen two...\n\n", m.spinner.View())
    return str
}
And we are done here! Well, mostly! Note that I also skipped importing the necessary packages and small things like defining the inputStyle variable. Feel free to fill the gaps yourself. Now, let's hook up everything together in the main function:
func main() {
    p := tea.NewProgram(firstScreen(), tea.WithAltScreen())
    if _, err := p.Run(); err != nil {
        fmt.Println("Error starting program:", err)
        os.Exit(1)
    }
}
It Works... Right?

Aaaaaaand... it works! You can switch the screens and nothing breaks! Except one thing... the spinner is not animating. This is because we are not running the Tick command for the spinner. We are calling the screenX.update(msg) method whenever we want to change screens; and that is how it should be. Except we have our m.spinner.Tick in the Init() method which is never getting called from our first screen. So, the solution I found for this is a RootScreen which has a SwitchScreen method to switch between screens. This RootScreen will be the glue which further binds all the screens together. The RootScreen itself is a tea.Model which holds other tea.Models — like a container model:
type rootScreenModel struct {
    model  tea.Model    // this will hold the current screen model
}

func RootScreen() rootScreenModel {
    var rootModel tea.Model

    // sample conditional logic to start with a specific screen
    // notice that the screen methods Update and View have been modified
    // to accept a pointer *screenXModel instead of screenXModel
    // this will allow us to modify the model's state in the View method
    // if needed

    if some_condition {
        screen_one := screenOne()
        rootModel = &screen_one
    } else {
        screen_two := screenTwo()
        rootModel = &screen_two
    }

    return rootScreenModel{
        model: rootModel,
    }
}

func (m rootScreenModel) Init() tea.Cmd {
    return m.model.Init()    // rest methods are just wrappers for the model's methods
}

func (m rootScreenModel) Update(msg tea.Msg) (tea.Model, tea.Cmd) {
    return m.model.Update(msg)
}

func (m rootScreenModel) View() string {
    return m.model.View()
}

// this is the switcher which will switch between screens
func (m rootScreenModel) SwitchScreen(model tea.Model) (tea.Model, tea.Cmd) {
    m.model = model
    return m.model, m.model.Init()    // must return .Init() to initialize the screen (and here the magic happens)
}
This brings us to make some small changes in our main.go file:
func main() {
    p := tea.NewProgram(RootScreen(), tea.WithAltScreen())
    // rest of the code remains the same
}
and the screenX.go files:
// note the use of pointer to the model again here. all function signatures
// have been modified to accept a pointer to the model - this includes the
// Init, Update and View methods for all the screen models (except the RootScreen)
// Replace screenX with the actual screen name

func (m *screenXModel) Update(msg tea.Msg) (tea.Model, tea.Cmd) {
    // ... rest of the code
            // any other key switches the screen
            screen_y := screenY()
            return RootScreen().SwitchScreen(&screen_y) // notice we are passing a pointer to the model
    // ... rest of the code
}
And that's basically it! Now, you can switch between screens and the spinner will animate as expected. You can also add more screens and switch between them as needed. I hope this article helps you in building your own multi-view interfaces in Bubble Tea. If you have any questions or suggestions, feel free to comment below — there's anonymous commenting too. To hear more from me sometime in or after the next 6 months, subscribe to my RSS feed. Until then, Bye.. I need to go rethink over my life choices. Hey, look at that! I didn't swear even once in this article! I'm getting better at this! (Seriously, cringe AF bro!)


https://gist.github.com/SlIdE42/2c386b13e32d271d7d71726ac047ed6d
Each screen can be loaded like this:
In any other screen defined in `screens/` we can just access it:
https://github.com/skatkov/bubbleteaTwoScreens
It has small changes here and there, but it's mostly the same ;-)